
Installation instructions for LuK clutch kit for Ford 1999-2003 applications
This article describes complete removal and replacement of the stock Superduty clutch system. It includes replacement of flywheel, clutch, pressure plate, release bearing and other clutch components with LUK replacement parts.
Recently I upgraded the stock clutch in my 1999 Ford F250 Super Duty to a Luk aftermarket clutch. I did this to prevent serious damage to the ZF 6-speed transmission in the event of a stock clutch failure. I was not happy with the "feel" of the stock clutch, it was quite inconsistent, "jerking" me around quite a bit. It would also occasionally emit chirping noises during deceleration. This article describes the upgrade process in detail.
The job requires about 7 hours. You can do it yourself, but a helper makes the job go a lot quicker. A garage with a vehicle lift and a good transmission jack makes this job much easier to do. The procedure given below is for a 4x4 model, with a one-piece rear drive shaft and ESOF. A 2Wheel Drive vehicle would make this job a bit easier due to not having to deal with the transfer case. Note: the subject vehicle had approximately 53,000 miles at the time of the upgrade.
The Luk clutch upgrade kit consists of a new clutch disc, pressure plate, pilot bearing, release bearing, alignment tool, flywheel, and upgrade tag. New bolts for the flywheel and pressure plate are also included. DO NOT re-use the old flywheel and pressure plate bolts! You should also ask for the updated clutch fork, it is a new heavier design. There have been a few reports of the stock clutch fork failing. Other items not in the kit but which should also be replaced are:
- Gasket: between transfer case and transmission, Ford P/N E7TZ-7086-A. You don't really need it, but will keep the transfer case/transmission joint from leaking if either the transmission output shaft seal or transfer case input shaft seal develops a leak.
- Clutch fork anchor stud, Ford P/N F81Z-7B602-AA. (Shown below.)
Both parts run about $5 at the dealer.
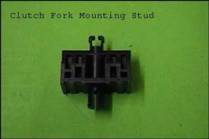
Clutch fork anchor stud, Ford P/N F81Z-7B602-AA.
Here are the steps required in performing the Luk clutch upgrade:
- Remove the negative battery terminal connections. Remove the four screws holding the rubber boot at the base of the shifter. A Phillips head screw is located under each corner of the rubber boot. Slide the boot up the shifter to gain access to the shift lever mount.
- Remove the two torx screws holding the shift lever to the transmission gear selector. Remove the shift lever.
- Remove the six screws from the top of the transmission gear selector. Remove the gear selector and plug the hole with a rag to prevent foreign material from entering the top of the transmission.
- Raise the vehicle on the lift. If no lift available raise the vehicle at at least 12" off of the floor. Make sure the vehicle is stable before doing any work. This truck is very front-heavy, so be sure to place the front lift points as far forward on the vehicle as possible. The front lift points should be just behind the front springs on the frame.
- Remove the three bolts from the starter. The wires on the starter can remain attached. Remove the starter from the bell housing, and hang the starter out of the way from the frame.
- On PTO equipped vehicles, disconnect all equipment from the PTO on the transmission.
- Unplug the electrical connectors from the transfer case (if electronic transfer case). Be careful not to damage the connectors. Unplug the reverse switch connector from the transmission. This connector is on the right side (passenger side) up near the top of the transmission. Remove the wiring harness from the transmission. Remove the vent hose from the transfer case ventilation port located on top of the transfer case.
- Mark the position of the drive shafts with respect to their end mounts. This keeps everything in balance when re-installed.
- Remove the front drive shaft from the transfer case and front differential yoke. A 12-point wrench is needed for the transfer case/transmission ends of the drive shaft, and a 6-point drive socket for the differential ends of the drive shafts.
- Remove the rear drive shaft from the transfer case and rear differential yoke.
- Remove the inspection cover (located at the front bottom of the bell housing). Three bolts hold this cover on.
- Remove the slave cylinder from the bell housing. Slightly push the slave housing towards the bell housing and twist to remove. Grab the push rod before it falls down inside the bell housing (If it falls, there's no going back without pulling the transmission.)
- Remove the heat shield from the exhaust system. This will allow better access to the right side transfer case bolts.
- Remove the transmission cooler lines from the transmission and strap them out of the way.
- Place the transmission jack under the transfer case. Remove the six bolts holding the transfer case to the transmission.
- Have a waste oil pan handy, as a bit of fluid may seep between the transfer case and transmission. Slide the transfer case back and remove it from vehicle.
- Place the transmission jack under the transmission. Remove the bolts holding the transmission to the crossover.
- Remove the 4 bolts holding the crossover to the right side of the vehicle.
- Remove the 3 bolts holding the left side of the crossover. Remove the crossover.
- Lower the transmission jack just a bit. Place a 2 x 6 block of wood between the front of the engine oil pan and the engine cross member to aid in reassembly later. The Power Stroke Diesel Engine has the majority of its weight located forward of the engine mounts. Placing the block of wood prevents the engine from tipping forward, making transmission re-attachment less difficult.
- Remove the six bolts holding the transmission to the engine.
- Slide (while rolling the jack) the transmission back until the input shaft clears the clutch, and then lower the transmission. Move the transmission back out of the way. This is one big tranny!
- Remove the bolts holding the pressure plate to the flywheel.
- Remove the pressure plate and clutch disc.
- Remove the bolts holding the flywheel to the engine. Be careful, the flywheel is heavy.
- Inspecting the stock components gave the following conclusions: The stock flywheel and pressure plate were in good condition. However, the stock clutch disc was showing signs of deterioration. The center hub was quite loose, the washers at the end of the springs were disintegrating, but the clutch disc lining was in good shape. Looking at this design, I can see how the springs could easily pop out of this disc.
- Prepare the new flywheel before installing it onto the crankshaft. Drive the new pilot bearing into the flywheel until it hits the stop. Be careful, as it is easy to damage the new bearing. Clean the surface of the flywheel and pressure plate with brake parts cleaner.
- Install the new flywheel using the supplied bolts. Clean and re-use the bolt ring from the old flywheel. Torque the bolts to 87 to 91 lb/ft. [Editors note: This is the torque required for the 07-155 LuK upgrade kit. Other LuK upgrade kits require different torque specs.]
- Here are front and back shots of the new Luk clutch disc. Notice the Luk disc has four large springs as opposed to three seen on the stock disc. The pictures seem to depict that the Luk Disc has less lining surface area than the stock disc. However, This is not the case. The Luk Disc has a 13-inch diameter as opposed to the stock configuration with a 12-inch diameter. While the stock disc may have more cross section thickness, the overall surface area is larger with the Luk Disc.
- Install the new clutch disc and pressure plate using the supplied bolts. Insert the clutch alignment tool before tightening the bolts. Tighten the pressure plate bolts in a star pattern. Torque the bolts to 15-20 lb/ft (foot pounds). Then remove the alignment tool from the new clutch.
- Now we will turn our attention to the transmission. Make it a point to remember how the clutch release bearing is installed in the fork before removing it. Remove the old clutch fork from the front of the transmission. Remove the old fork-mounting stud too. Inspect the input shaft of the transmission for burrs or excessive wear. Finding trouble here will require major repair to the transmission.
- If all is well then install the new fork mounting-stud at this time. Remember that you took notice of how the clutch release bearing is installed in the old fork. Install the new release bearing into the new fork in the same way.
- Slide the new fork/bearing onto the input shaft of the transmission and engage the end of the fork onto the mounting stud (at the left end of the fork).
- After successfully installing the new components, begin the re-installation of the transmission. Raise the transmission back up to the engine. Line up the transmission and slide the transmission back onto the engine. It is important that the pilot shaft enters the pilot bearing. Do Not Allow the Transmission to hang on the clutch spline without the pilot shaft engaged in the pilot bearing. Once the pilot bushing is engaged and one bellhousing bolt can be started on each side, the bolts can be alternately tightened to gently mate the transmission fully onto the engine. Install the remaining bolts into the bellhousing/engine. Tighten to 46 lb/ft. (foot pounds).
- Lower the transmission a bit and remove the block from the front of the engine.
- Raise the transmission and install the cross-member. Torque bolts to 52 lb/ft. (foot pounds).
- Install the transmission to cross member bolts. Torque bolts to 60 lb/ft. (foot pounds).
- Clean the mating surfaces between the transmission and transfer case. Install the new gasket on the tail of the transmission. You may have to apply a bit of gasket maker to the gasket to keep the gasket from falling. Lift the Transfer Case with the Transmission Jack, align, and install the transfer case onto the transmission. Torque bolts to 37 lb/ft. (foot pounds). Be careful as to not to damage the motor on the bottom of the electronic transfer case.
- Reconnect the vent hose on top of the transfer case. Install the wiring harness to the transmission, and install the Luk clutch tag to the side of the transmission (one of the bolts holding the wiring harness is a good place). Reconnect any electrical connectors removed earlier.
- Install the transmission cooler lines into the transmission. Tighten to 20 lb./ft. (foot pounds).
- Install the exhaust system heat shield.
- Make sure the clutch slave pushrod is inserted into the end of the slave cylinder. Re-install the slave cylinder into the bell housing. Twist and lock into position.
- Install any PTO options at this time.
- Install the bell housing cover. Tighten bolts to 21 lb./ft. (foot pounds).
- Install the drive shafts. Apply Loctite 242 to the transmission/transfer case drive shaft bolts. Torque transmission/transfer case ends to 76 lb./ft. (foot pounds). Tighten differential ends to 26 lb./ft. (foot pounds). New bolts should be used at the differential ends of the shafts if possible. Replace the 12-point bolts after the third removal. Insure that the marks made previously are lined up before installing to insure the shafts remain in balance.
- Install the starter. Tighten bolts to 20 lb./ft. (foot pounds).
- If the transmission and/or transfer case fluids were drained, re-fill them at this time. I would recommend Amsoil synthetic ATF or Red-Line D4-ATF. If they were not drained, check the transmission and transfer case oil levels.
- Give a final once-over to all fasteners, lines, connectors, and verify everything is re-installed correctly. Then you can lower the vehicle.
- Remove the rag from the top of the transmission and clean the mating surfaces between the top of the transmission and the gear selector. Apply a small bead of gasket maker to the gear selector housing, and re-install the housing into the transmission. Torque the bolts to17 lb./ft. (foot pounds).
- Install the shift lever. Torque the bolts to 21 lb./ft. (foot pounds).
- Install the shift lever boot.
- Connect the negative battery terminal connections. Start the vehicle and check for proper clutch operation. Check transmission cooler lines for leaks. Verify proper operation of transfer case.
- Now enjoy the new Luk clutch! The first thing you will notice is a much reduced clutch pedal effort. The second thing you will notice is how smooth the clutch operates.
